In my series about Modern Infrastructure for your Virtual Development Server I will now start my Server with Vagrant in VirtualBox on Windows. Again I will use Jenkins as example for this. See how this works.
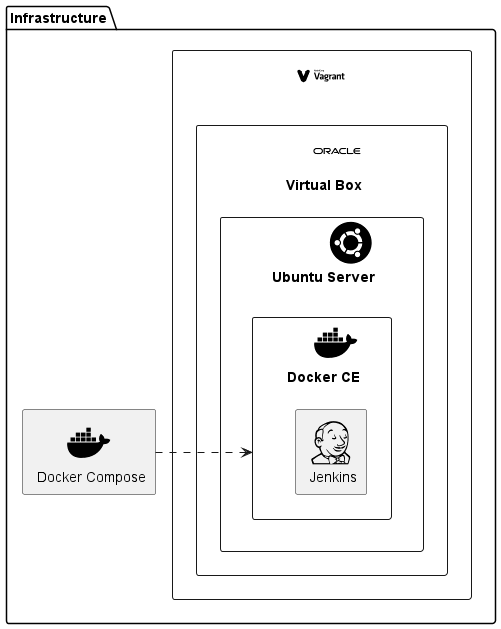
Here you see the architecture overview:
I use this architecture here in windows, but it should work similar on all environments, where Vagrant and VirtualBox is available for.
At first I install Vagrant and VirtualBox with Oracle VM VirtualBox Extension Pack.
Via this Vagrantfile I create my infrastructure:
Vagrant.configure(2) do |config|
  config.vm.box = "bento/ubuntu-22.04" (1)
  config.vm.network "forwarded_port", guest: 8080, host: 8080 (2)
  config.vm.provider "virtualbox" do |vb|
    vb.name = "DevelopmentServer"
    vb.customize ["modifyvm", :id, "--cpus", "2"] (3)
  end
  config.vm.provision "shell"  do |s|
    s.path = "bootstrap.sh" (4)
  end
end| 1 | Use a Ubuntu box with vagrant user preinstalled as official boxes does not have vagrant user and some other operating systems require Docker EE. |
| 2 | Forward the port from Jenkins Docker container to my local host. |
| 3 | Workaround "kernel panic" issue with current VirtualBox version by configuring at least 2 CPU’s. |
| 4 | Call provisioning script for installing Docker itself and the Jenkins Container. |
Sure I could create the whole server here, but instead I install only Docker und run then the same Dockerfile as in my blog Run your Development Server on Docker Desktop on Windows.
#!/bin/bash
(1)
sudo apt-get update -y
sudo apt-get install -y \
    ca-certificates \
    curl \
    gnupg \
    lsb-release
sudo mkdir -p /etc/apt/keyrings
curl -fsSL https://download.docker.com/linux/ubuntu/gpg | sudo gpg --dearmor -o /etc/apt/keyrings/docker.gpg
echo \
  "deb [arch=$(dpkg --print-architecture) signed-by=/etc/apt/keyrings/docker.gpg] https://download.docker.com/linux/ubuntu \
  $(lsb_release -cs) stable" | sudo tee /etc/apt/sources.list.d/docker.list > /dev/null
sudo apt-get update -y
sudo apt-get install -y docker-ce docker-ce-cli containerd.io docker-compose-plugin
sudo service docker start

(2)
pushd /vagrant || exit
sudo docker compose up --detach| 1 | Install Docker Engine on Ubuntu as described here |
| 2 | Change to automatically mapped source directory and start the Docker Compose file. |
From the directory of your files you can now use following commands to control your Development Server:
vagrant up
vagrant halt
The first start needs some time, as the provisioning takes place one time.
If you start your server you should see the following in the Docker Desktop Console:
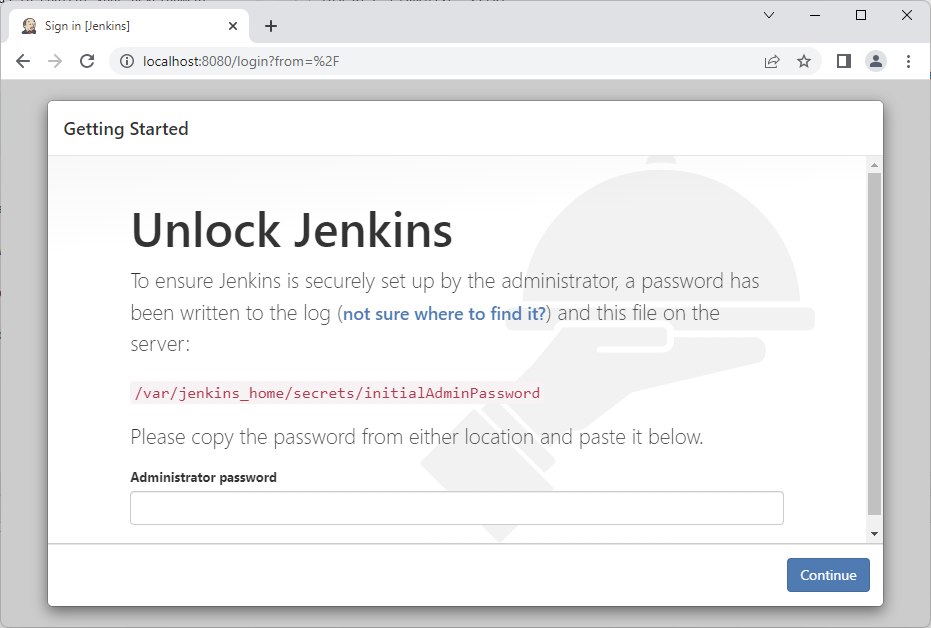
As your server is running you can now access it via localhost:8080:
How do you get now the initial password?
vagrant ssh (1)
sudo docker ps (2)
sudo docker exec -it vagrant-jenkins-1 more var/jenkins_home/secrets/initialAdminPassword (3)| 1 | open console to your VirtualBox guest |
| 2 | list the runnung docker Container, in my case vagrant-jenkins-1 is the name listed for my container under the names columns there |
| 3 | show the initial password from the mentioned path in the screenshot |
You find all sources on GitHub.
That’s it!

